Contouring Made Easy: A Beginner's Guide to the Perfect Look


Although we're not on top of the contouring trend right now, we're still intrigued by the idea of a sculpted look—albeit more natural than in years past. The heavily shaded, highlighted aesthetic isn't for everyone, but it has taught some of us how to sculpt cheekbones and enhance our jawline. It's not always clear which products to use and where to clean them on your face, which is why we've put together a step-by-step guide on how to contour your face.
What is contouring?
Contouring is the process of shaping a part of the face and enhancing the facial structure with makeup. It's a technique previously reserved for runway models and high-end photo shoots, but it's now a part of many people's daily routines, thanks to celebs and Instagram makeup artists who share the same passion for chiseled looks.
How to use Contour: A step-by-step guide to contouring your face
Step 1: Prepare your face
Always use skincare to prep your face before applying makeup. To prevent makeup around dry skin or harsh lines, wash your face and apply moisturizer. Prime your face using a primer that acts as a barrier between your skincare and makeup, allowing both to work better and last longer. Cover any blemishes or dark spots with a little foundation and/or concealer in shades that match your natural skin tone and undertone.
Step 2: Shadow
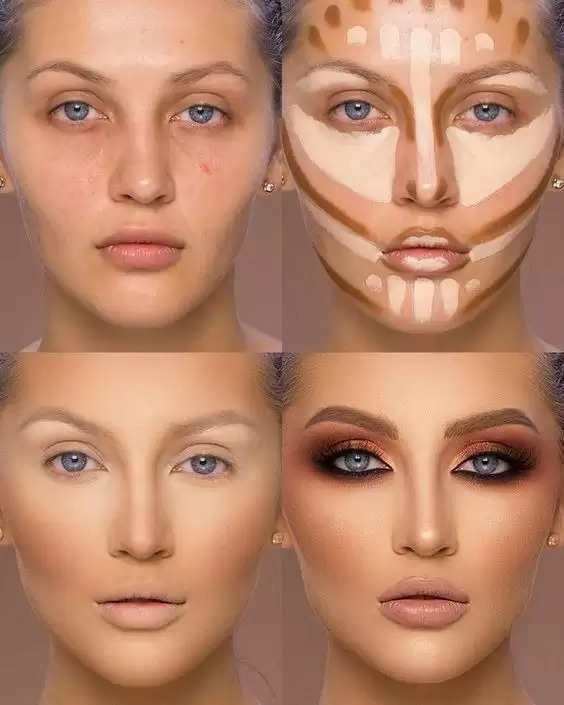
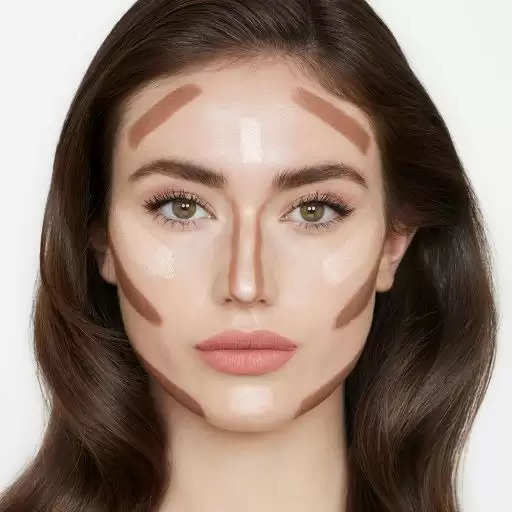
The most popular method of contouring is to use your darkest shade to create a shadow under your cheekbones. Pinch your cheeks and trace the product along the hollows of your cheeks, following the natural shape of your jaw and temples to find your cheekbones. You can place your shadow in one of three places depending on the shape of your face: along the sides of your nose, in a "3" shape that goes along your hairline, under your cheekbones, and under your jawline. Experiment with different lines and shadows to sculpt your face until you find a look that suits you.
Step 3: Highlight
Apply a light concealer shade or shimmery (but not sparkly) highlighter to areas of your face that naturally reflect light, such as your forehead, bridge of nose, tip of nose, tops of cheekbones, cupid's bow and around the eyes and browbones. .
Step 4: Blush
While applying blush to the apples of your cheeks isn't necessary for a contour look, it can help your makeup look more natural by appearing as a bridge between your shadow and highlight areas.
Step 5: Mixing
Blending is especially important when working with shades that don't match your skin tone. Blend your shadows and highlights into your skin or foundation layer with a large, fluffy brush, blending brush, or makeup sponge until the lines you create look more natural.
Step 6: Set it in place
Apply a setting powder or spray to lock your sculpted face in place and achieve a flawless finish.